%20(1).svg)
The topic of this article is a scientific review of bench press technique. Originally published on the Lihastohtori (Muscle Doctor) blog as the second part of the bench press blog series.

The Bench Press and Its Technique
This article covers bench press technique based on the best research evidence and concrete tips that are easy to
absorb. The writing was reviewed by Muscle Doctor Juha Hulmi as well as experienced bench pressers Anna
Rytivaara and Timo Hokkanen. The article is aimed at everyone who wants to understand what good bench press
technique consists of and why certain technical details in bench press technique are important.

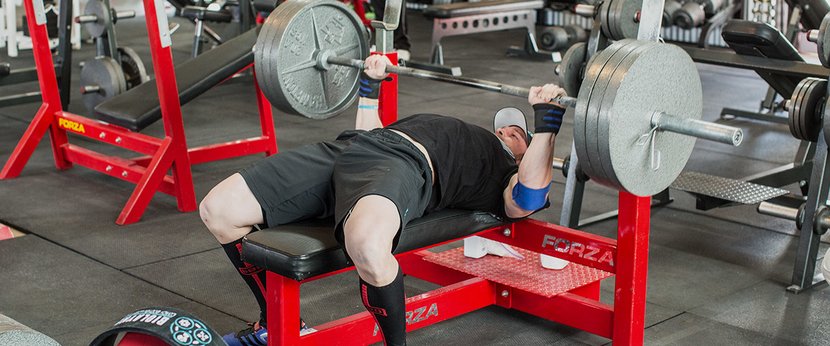
IMAGE 1. Source
The bench press as a movement
The bench press develops several muscle groups and is one of the most effective upper-body exercises in the gym. So the question "How much do you bench?", which has become something of a joke, is by no means a pointless question — it says a lot about upper-body force-production potential.
The bench press is one of the three main lifts of powerlifting, together with the squat and the deadlift. It is thus one of the most commonly
used movements for measuring upper-body strength. The bench press activates especially the chest muscles,
shoulders and triceps, so it is a very versatile movement for strengthening the upper body.
How often
should you bench press? For a beginner, training the bench press 1–2 times a week is enough, and at the start of
training a good goal is 2–3 training sessions per week in total. At an intermediate level, it's worth benching
2–3 times a week so that the stimulus stays sufficient for continued progress. The most important thing,
however, is the quality of technique: correct bench press technique can improve your result significantly,
because force transfers to the bar more efficiently and injury risk decreases.
Refining technique isn't only a safety question: correct technique in the bench press can improve your result by an estimated 5–10%, because force transfers to the bar more efficiently and energy loss decreases.
Bench press technique
Bench press technique can be divided into two parts: forming the starting position and the pressing phase itself.
The text also covers other details, such as foot position, taking the bar off the rack, and mental cues during
the rep. A properly performed bench press fulfills four main points:
1. The shoulder blades stay
retracted (pulled together) throughout the whole rep.
2. The shoulder blades and glutes stay firmly
against the bench and the soles of the feet against the floor.
3. Once the bar is off the rack, it starts directly over the shoulder joint and moves in a shallow arc to the chest.
4. Viewed from the side, the elbows stay perpendicular, directly under the bar, throughout the whole
rep.
These main points are achieved with the right kind of starting position and control of the bar path.
Next, let's go through the bench press step by step. It's good to note that there are several ways to find
the starting position. Below we go through one way that leads to a good starting position. In the end, though,
it's the result that counts.
Getting onto the bench and positioning the feet
In the bench press, the right starting position lets you press safely and effectively while the position stays
stable.
The aim is to settle onto the bench in a good position, so that the bar is roughly directly above
your nose. At this point the bar is still mechanically easy to get up off the rack, and it won't hit the rack
during the rep and disturb the lift.
The soles of the feet are kept either firmly flat on the floor or
only on the balls of the feet (in all powerlifting federations the latter is not allowed). The heels-on-the-floor
position is a bit more stable, because a larger area of the sole is in contact with the floor, which lets you use
the legs — i.e. "leg drive" — more. You can also look for a position that suits you by trying to turn the feet
outward as in the image below. Alternatively, the feet can also point forward, parallel to the bench, if "leg
drive" feels difficult with the legs wide and the feet turned out.
Being only on the balls of the feet, on
the other hand, can give a greater arch in the lower back compared to pressing with heels on the floor, but "leg
drive" is weaker. It's worth trying which feels better to you. As a baseline, it's best to train the bench press
with heels on the floor for better support, unless the goal is to maximize the height of the arch (IMAGE
2).

IMAGE 2. The most common foot-position options. It's worth trying which position feels more stable. What matters
is that you can keep the position tight throughout the whole lift. You shouldn't change the position
mid-lift.
After finding the right foot position, you take your grip on the bar. You grip the bar so that it sits right at
the base of the thumb, keeping the wrist straight. This avoids the wrist bending during the lift, which would
create an extra lever arm between the wrist and the bar. Force transfers more efficiently along the forearm to
the bar when the wrist isn't bent. In addition, a bent wrist can cause wrist pain. Besides placing the bar at the
base of the thumb, it's important to grip the bar as hard as possible. This makes it easier to keep the wrist
straight and may increase tension in the arm muscles and thereby stability in the lift (Nuckols, blog post).
The correct shoulder blade position
After taking your grip, pull your shoulder blades tightly together. Bringing the
shoulder blades together during the bench press increases the functional space of the shoulder joint (the
subacromial space) by up to threefold, reducing the risk of shoulder impingement (Solem-Bertoft
et al. 1993). As a mental cue you can use the idea that there's a pen between your shoulder blades that
you're trying to squeeze together with them. Before getting onto the bench, you can try pulling the shoulder
blades together as in the image below (IMAGE 3).

IMAGE 3. Bringing the shoulder blades together. Some people may find it hard to control the movement of the
shoulder blades, in which case it's worth practicing this, for example with resistance-band resistance. Attach a
band pulling straight from the front, for example, and try to pull just the shoulder blades tightly together.
Many people find the pressing position better when they also pull the shoulder blades downward (into
depression).
Start by lying on the bench with your feet firmly on the floor and the bar above your chin. Next, let's look at
getting the upper-back position tight, which brings the bar to the right spot directly above your nose. First
lift your upper back off the bench and imagine pulling your "shoulder blades toward your back pockets." As the
upper body rises, it's easier to bring the shoulder blades closer together. When you set your upper back back
down onto the bench, your nose — instead of your chin — should be directly under the bar (IMAGE 4).

IMAGE 4. Finding the position happens in three phases: 1) First lying relaxed with the chin above the bar, 2) The
upper body is raised while bringing the shoulder blades together. If you wish, you can take a little momentum
from behind the bar, which lets you "swing" the upper body into even more of an arch. 3) The upper back is
lowered back onto the bench, so that the nose — instead of the chin — is under the bar. At this point you can
still actively press the shoulder blades together and toward your backside, which makes the arch and retraction
even tighter.
Now your shoulder blades should be tightly together. The arch of the back has also strengthened now, which
likewise increases the functional space of the shoulder joint (Gumina
et al. 1991), placing the shoulder joint at a better angle for the lift.
Taking the bar off the rack
At this stage, the correct height of the bench-press rack is essential so that the bar can be taken off
correctly, whether you take it yourself or with a spotter. The most common mistake is to push the bar up out of
the rack so high that the shoulder blades don't stay together. Once the bar has already been taken off
incorrectly, getting the shoulder blades into the right position is very difficult. This is why taking the bar
off the rack correctly is extremely important. Nor should the spotter lift the bar too high, because otherwise
the bench presser's shoulder blades come out of retraction.
Done properly, the bar should be "pulled" out
of the rack. By this we mean that you can't push the bar upward; instead, imagine pulling the bar out of the
rack, so that the bar rises just enough to come out of the rack while the shoulder blades still stay together.
Taking the bar off the rack is also easier when you lift your glutes up off the bench, breathe in, and hold your
breath until the bar is out of the rack and brought perpendicularly above the shoulder joints, into the starting
position of the lift.
After this you can lower your glutes back onto the bench and take in air again for
the lift itself. You can practice getting the bar directly over the shoulder joints by moving the bar back and
forth a little, parallel to the bench, with straight arms; the bar should feel lightest when it's directly over
the shoulder joints (IMAGE 5).

IMAGE 5. Taking the bar off the rack in three phases: 1) Breathe in and take a tight grip on the bar 2) Lift your
glutes up a little so the shoulder joint is in a better position for pulling the bar, and pull the bar out of the
rack 3) Lower your glutes back onto the bench.
The lowering phase
At this stage you've taken the bar off the rack and brought it to the right spot above the shoulder joints.
Next, pick a fixed point on the ceiling above the bar. A fixed point during the lift makes it easier, in the
pressing phase, to return the bar back directly over the shoulder joints to the starting position, because your
gaze is in the pressing direction (comparable to a tennis stroke, where you look at the target you're hitting the
ball to, not at the racket). You also want to keep your head still, so you can focus on the bar's movement and
it's easier to hold the fixed point. You don't need to press your head against the bench, since that can cause
neck pain, but it also mustn't rise during the lift. Try to keep the neck relaxed but the head position
still.
In addition, before the lift it's absolutely important to breathe in as much air as possible. This
slightly raises the thoracic spine and increases the tightness of the position thanks to the increased pressure
in the abdominal and thoracic cavities. The breath is held throughout the whole lift. It's important to note that
there's no rush to lower the bar after taking it off the rack. So at the start of the lift you can focus on
breathing in strongly and only then start lowering the bar.
Before lowering the bar, you can use two
mental cues that make it easier to find the correct bar path and a controlled lowering phase. The first cue is to
imagine bending the bar, so that your elbows turn slightly toward your sides (IMAGE 6, right). So throughout the
lowering phase you grip the bar hard while trying to bend it. The second cue is to imagine pulling the bar apart
in the middle, i.e. moving your hands away from each other (IMAGE 6, left). With these cues the bar path in the
lowering phase is easier to find. In addition, these cues can help keep the upper-back position tighter, which is
important so the position doesn't fall apart mid-lift.

IMAGE 6. The cues of pulling the bar apart and bending it help in finding the correct bar path in the lowering
phase. Image used with the permission of Greg Nuckols from the Stronger by Science blog.
It's extremely important that the lowering phase is controlled. This standardizes where the bar touches the chest
and keeps the technique good. McLaughlin & Madsen
(1984) found decades ago in their study that more experienced lifters brake the bar's descent more
than less experienced ones. There are nowadays many exceptions to this among experienced lifters, for example
Timo Hokkanen (in the video below) and several others. As a baseline, it's worth learning to control the bar
during the descent. Some can lower faster than others and still keep control. Descent speed can also be affected
by grip width, since with a wider grip lowering the bar may require more control. There's no need to exaggerate
the duration of the lowering phase, but it's usually about 1–3 seconds.
VIDEO. The holder of the European record in the classic (raw) bench press in the under-120 kg weight class (245 kilos), Timo Hokkanen, demonstrates the
bench press with a very fast but controlled descent. As an example of a much slower descent, there's, among
others, the holder of the Finnish heavyweight record, Fredrik Smulter.
The correct touch point of the bar
Where the bar touches the ribcage depends largely on grip width, but in general it can be said that the bar
should touch between the lower part of the sternum and the upper part of the chest muscle (IMAGE 7). In addition,
your elbows should be under the bar, viewed from the side, when the bar touches the ribcage. Lowering the bar too
close to the shoulder joint, i.e. toward the neck, likely increases injury risk and is not recommended (read Part I). You can practice
standardizing the correct touch point by putting chalk (magnesium, which you can rub into your hands to improve
grip) on the middle of the bar, so that a line of chalk is left every time the bar touches your shirt. Try to
always lower the bar to the same spot, in which case the line should be thin — unlike if every rep has touched a
different spot.

IMAGE 7. Where the bar touches varies, depending largely on grip width. Usually it's between the lower part of the
sternum and the upper part of the chest muscle. What matters is that the elbows are directly under the bar
throughout the whole lift.
The pressing phase
If you don't intend to compete in the bench press, you don't need to practice pausing the bar on the chest.
It's still worth leaving out bouncing the bar, though, if you want to load the muscles effectively. Even though a
pause isn't needed, the bar should still touch the ribcage before pressing up. This keeps technique standardized
and the range of motion full. It's also easier to move big loads when the ribcage helps stop the bar before
pressing up.
Immediately as the bar touches the ribcage you can begin to press it up maximally (when doing
it without a pause). Since the aim is to press the bar back to the starting position above the shoulder joints,
as the bar leaves the chest you can aim to press it up and slightly back. At the same time, push your elbows out
to the sides, but so that the elbows stay perpendicular, directly under the bar (IMAGE 8). A good rule of thumb is
that the elbows should be at roughly a 45–75 degree angle relative to the body at the moment the bar touches the
chest. Too wide an elbow position is one of the most common mistakes — it stresses the shoulder unnecessarily and
weakens force production.
So the bar paths of the lowering phase and the pressing phase differ slightly from each other, even though in both
the bar moves in an arc. In an optimal lift the bar descends in an arc all the way to the ribcage, whereas in the
pressing phase the bar goes right from the start back toward the shoulder joints, making the bar path slightly
different. At the top the bar returns directly above the shoulder joints.

IMAGE 8. Above is shown the correct bar path during the press-up. Immediately after leaving the chest, the bar is
pressed up and slightly back, so that the lift is mechanically most efficient for the shoulders. Below is the bar
path often seen in beginners, which is considerably weaker in terms of force production. Image used with the
permission of Greg Nuckols from the Stronger by Science blog.
How do I choose the right grip width?
Grip width is very individual and depends on the goal, preferences, lever arms, the strength ratios of the muscles, and previous injuries. The starting point, however, is that the grip is wider than the shoulders and at most about 1.5 times shoulder width. A grip wider than this can increase injury risk (Green & Comfort 2007). Grip width should usually be chosen at first so that the forearm is vertical when the bar is down on the chest. After that you can try a wider grip if you find it better. So grip width can be used to influence the loading between muscles and the bar path. You can read about this and about lever-arm ratios in the mechanics section of the first bench press article.
Breathing technique in the bench press
Correct breathing technique is an essential part of executing the bench press. Take a deep breath in and brace
your whole body before lowering the bar. Hold your breath through the lowering phase and the hardest point of the
press, and only breathe out near lockout. A working breathing technique stabilizes the ribcage and can, on its
own, improve your result by several percent. You can read more about breathing technique in our scientific article on breathing
technique in gym exercises.
Leg drive – the role of the legs in the bench press
Leg drive — active use of the legs — is part of effective bench press technique. The force produced by the legs transfers through the hips and the arch of the back to the ribcage and supports the lift. Well-executed leg drive can add an estimated 5–10% to your bench result, so it's worth practicing the correct position carefully if your goal is specifically to maximize your bench press result.
The aim is to use the legs to push your upper back more tightly against the bench, which makes it easier to keep
the shoulder blades in the right position. For leg drive you can use the cue of pushing your upper body toward the bench-press rack. This
tension should be maintained throughout the lift, so that the position doesn't fall apart during the lift.
Often the force produced by the legs is mistakenly directed upward, which raises your backside. The aim,
however, is to produce force horizontally — that is, by pushing the body parallel to the bench (IMAGE 9). This way
the glutes also stay against the bench. If your backside comes up off the bench easily, it's probably because
your feet are too far forward. In that case, inch your heels further back, so that your backside no longer comes
off the bench as easily.

IMAGE 9. Use your legs to push your body toward the rack throughout the whole lift, so you can keep the position
as tight as possible.
General notes on training
Breathing in the bench press works the same way as, for example, in the squat (see correct breathing
technique). Before lowering the bar, breathe in maximally and hold your breath throughout the rep.
Breathe in again between reps, during which the bar can pause briefly at the top. If you're doing a longer set,
it's not necessary to take a fresh breath after every rep. You can, for example, hold your breath for two reps
and only then pause the bar briefly at the top and breathe in again.
Using a spotter to take the bar off
the rack can be sensible, especially with heavier loads, because the shoulders are behind the bar when viewed
from the side, which makes taking the bar harder and can drain energy from the lift itself. The correct height of
the bench-press rack is also important so the bar can be taken up without the position falling
apart.
When learning bench press technique, it's best to keep the weights moderate, so you can focus on
strengthening technique rather than on surviving the last rep. As technique strengthens, loads can be raised
closer to maximal weights.
The bench mustn't be slippery, since otherwise the correct shoulder-blade
position and arch won't stay tight. If the bench feels slippery, you can put an exercise mat on top of it or wrap
two resistance bands around it, parallel to the bench, to add friction between the bench and your upper back.
Alternatively, you can also put chalk (magnesium) on your upper back to add grip. Technical sports shirts are
often bad for the bench press, since they slip really easily.
"Strength is speed" applies to the bench
press too. The more effectively the bar can be started upward off the chest, the more easily the lift succeeds,
as long as technique stays good. So aim to develop your bench press technique so that you always start the rep
upward at maximal speed while maintaining good technique. You can use, for example, speed-strength training to
develop an explosive start. For speed-strength bench pressing, added resistance provided by resistance bands is
handy for reducing the deceleration in the final phase of the lift (Hulmi 2003).
In addition to
speed-strength training, you can use various variations to strengthen your bench press. With variations you can
emphasize a certain phase of the lift, for example by doing board bench presses, where a spotter holds a block of
wood on your ribcage. In this case the lift is only half, because the bar only descends onto the board. With this
variation you can train specifically the lockout phase of the bench press with "oversized" loads. Variations can
also introduce stimulus variety and enhance the development of coordination in the lift itself. However, if the
goal is to progress in the bench press, you can't build all of your training on variations; most bench press
training must be normal, full-range bench pressing itself (e.g. Martinez-Cava et al. 2019).
The full range of motion of the bench press has been shown in research to produce better results in muscle growth and force production than partial reps. Bouncing the bar off the chest is a common mistake: it removes the loading of the stretch phase and weakens the stimulus.
Tips for beginners
If you're a beginner, start the bench press with just the bar (an empty 20 kg bar or lighter). Focus on learning technique before adding weight — at first use about 50–80% of your estimated max, so that every rep is technically clean. Also, use a spotter whenever you lift heavy weights or do a set close to failure.
Alongside poor technique, the wrong rep and set numbers can also slow progress, so the program should be
individually calibrated from the start. A good gym program for a beginner calibrates
the bench press weights and reps to the right level from the start and ensures sensible
progression.
Summary and recommendations
As we noted, the bench press is a technically demanding movement, and it's worth trying to develop your technique as good as possible. Even more experienced lifters often have "aha" moments when they notice a small change in technique bringing more kilos to the bar.Remember that warm-up and approach sets are a good place to practice technique with light weights. So focus on
doing them with the best possible technique. If you feel something should be done differently, try making
adjustments to your technique already in these reps. You can, for example, pay attention to one technical detail
mentioned in this article at a time, in a single workout. That way you don't need to — and shouldn't — try to
develop every little detail at once. In the end, correct technique is learned by repeating the movement over
several weeks with sufficiently heavy iron, so that the technique holds together on every
rep.
In addition to technique, progress requires sensibly programmed training. The AITOFIT training
app sizes the weights and sets automatically.
Try AITOFIT free for 9 days and see how a science-based AI
training program works in practice. Start your workouts and by all means drop us a message in the chat about how
it's going!
Author: Tapio Tulenheimo, M.Sc Exercise Science (Exercise Physiology), University of Jyväskylä | Reviewed by: Julius Granlund, M.Sc Exercise Science (Exercise Physiology), University of Jyväskylä
Individualized and evidence-based personal training made easily accessible to everyone.