%20(1).svg)
Originally published on the Lihastohtori (Muscle Doctor) blog as the final part of the deadlift blog series. The purpose of this article is to teach everyone a suitable deadlift technique in a simple way. This version was updated on 26 July 2026.

The Correct Deadlift Technique
How do you perform an effective and safe deadlift? What's needed is a repeatable, simple and easy method for
learning the deadlift technique and movement. This article walks through easy, immediately applicable
instructions for the deadlift that will help every lifter — regardless of body structure — perform the movement
effectively and safely. The deadlift technique consists largely of getting into the correct starting position.
The lift itself is easy to perform once the setup is right. For clarity, this article focuses mainly on the
conventional (narrow) deadlift technique, but the sumo deadlift is also covered. Many of the technical points of
the sumo and the conventional deadlift are the same, which is why it's practical to go through the conventional
narrow pull first. First, let's look at how the feet and hands should be positioned.
Correct deadlift technique: 1. How do I position my feet and hands?
Foot and hand position

Feet
For most people, the feet are in their strongest position for the deadlift at
roughly hip width, and that's a good starting point. So the stance is typically much narrower than in the squat.
From this starting point you can try narrower or wider stances and see what feels best and strongest. There's no
black-and-white answer for the exact stance width: some people pull with their heels almost touching, and others
use a wider stance.
The second thing to consider is how much the feet are turned out (i.e. how much the toes point forward/outward). Slightly outward-turned feet allow for better external rotation of the hips, the benefit being an increased role for the adductors and external rotators in the lift. The starting position also becomes a little more optimal, as the thigh bones settle a bit "out of the way," pointing to the side, and the back sets into a slightly more upright position. The optimal amount of external rotation is very individual, and a good general rule is to point the toes 10–30 degrees outward. That said, don't overthink it — it's enough to set up in roughly a hip-width stance with the toes pointing slightly outward.
Quick test: Take a hip-width stance and point your toes straight ahead. Now extend your hips forward by squeezing your glutes hard together. Often the feet will want to turn slightly outward. If that happens, that amount of external rotation is probably close to the optimal position for you.
Hands
There are two things to consider with the grip: grip width, and the way you take hold of the bar. The right width is simple to determine: arms as straight as possible. In other words, grip width comes to about shoulder width — the way the arms naturally hang when you're standing. A wider grip makes the lift and the starting position a little more mechanically difficult.
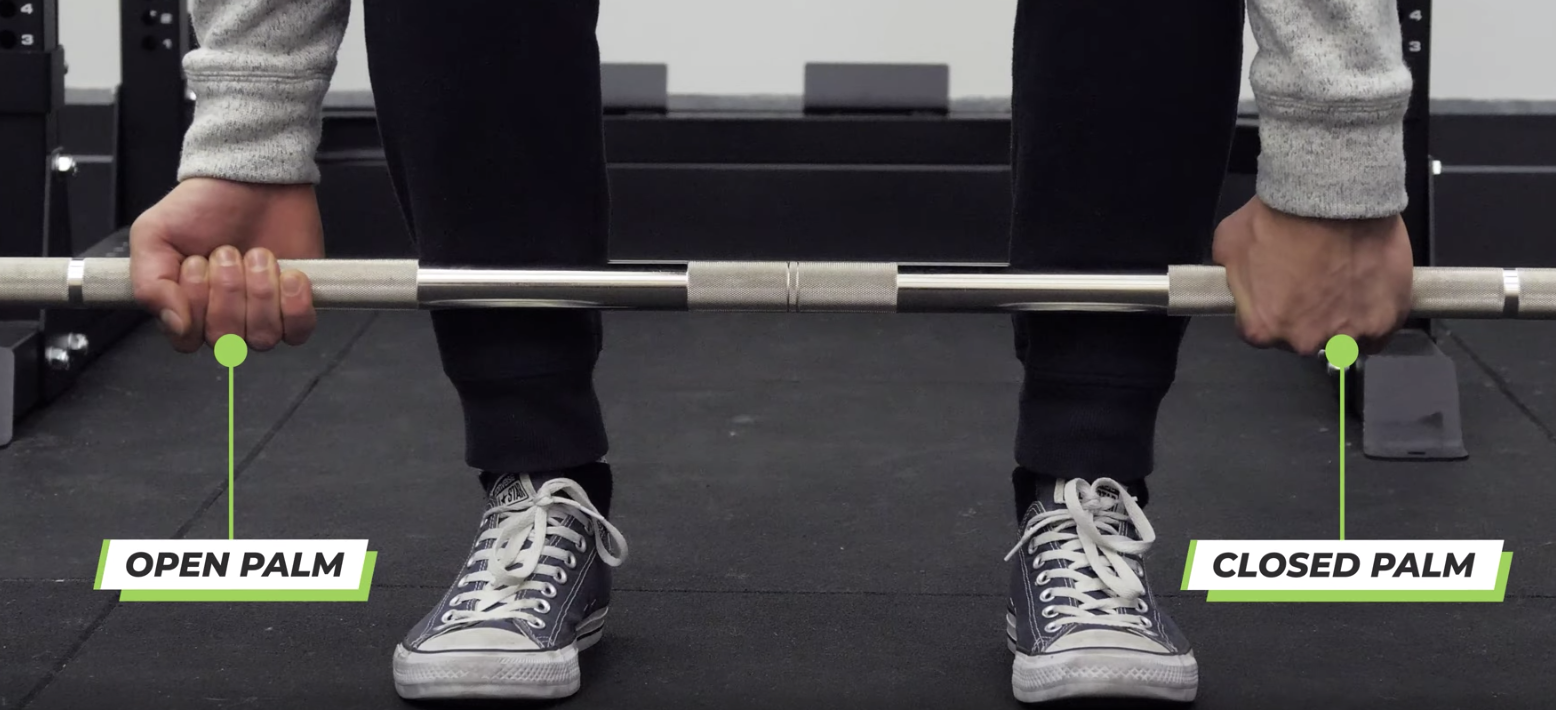
You can take hold of the bar in different ways: with a mixed grip, an overhand grip with a thumb lock ("hook grip"), or a normal overhand grip. It's good to start with a normal overhand grip — knuckles forward, as in the image above — but without straps your grip strength will probably give out there when going for maxes or in longer sets, before the force required for the lift runs out in your legs. That said, grip strength with the overhand grip does develop well.
The most common grip when lifting heavy iron is the mixed grip, where one palm faces forward and the other faces inward. This makes it easier to hold on to heavier weights, because the grip prevents the bar from rotating and slipping out of the hands. The downside is that the grip can predispose you to developing imbalances as well as to a biceps tear in the arm whose palm faces forward (Beggs 2011), though this is rare. You can also avoid developing excessive imbalances by alternating the grip between sets.
The hook grip removes the downsides of the mixed grip and allows a solid hold on the bar. It does, however, take some getting used to, since it's often a bit more uncomfortable for the thumbs.
Whatever the grip style, you should take hold of the bar so that the bar is closer to your fingers than to your wrist. It's a common (albeit fairly minor) mistake to take the bar too deep into the palm. You want the bar closer to the fingers throughout the whole movement — where the bar ends up settling anyway when lifting heavier iron.

Image. On the right, the bar is too "deep" in the palm. In the upper image the bar is closer to the fingers, so that the bar sits, as it were, further out along the hand — which also makes it easier to get into the starting position. This is the correct technique. Image from Greg Nuckols' Stronger By Science blog.
Next, let's go through the steps for getting into the deadlift starting position!
Correct technique: 2. Starting position
Getting into the starting position
Summary:
1. Stand so that the bar is over the midfoot. 2. Take hold of the bar without bending your knees or lowering your hips. 3. Press your shins against the bar. Your hips will lower to the correct height at the same time. 4. Straighten your back. 5. Tighten your lats. 6. Pull.
Now let's go through each step in more detail.
Step 1. Midfoot directly under the bar.

Set up at the bar so that the middle of your foot is directly under the bar. You can imagine the bar splitting your foot down the middle. For most people this is correct when the bar is 2 cm away from the shins while standing. "Midfoot" means the middle of the whole foot, from heel to toes. Not just the section that lies between the shin bone and the toes. Keep the bar in this spot throughout the entire setup.
Note: The deadlift is best done without shoes or in shoes that are as flat and low-soled as possible.
Step 2. Take hold of the bar.

Once the bar is in the middle of the foot, reach down and grab the bar without lowering your hips or pressing your shins closer to the bar. In other words, you simply bend down to take hold of the bar. Note: arms straight (from the front), not bent. At this stage the back is still rounded; it gets straightened and tightened later.
Step 3. Setting the shins against the bar.

Press your shins against the bar. At the same time, your hips lower to the correct height. A common mistake at this stage is to push the shins forward so much that the bar moves forward, which drops the hips too low. The shins should be pressed against the bar so that they just touch it; the bar must not move forward. At this stage it's a good idea to simultaneously push the knees out a little, so that the hips settle into external rotation. The knees now (often at this point) touch the elbows, which is fine, as long as the arms don't push the knees inward. Another common mistake here is the weight shifting onto the toes. This is easy to correct by leaning back slightly so the weight settles into the middle of the foot.
Step 4. Straighten the back.

The back still needs to be straightened. The goal is to trigger an activation of the spinal erector muscles that starts from the thoracic spine and straightens and tightens the entire back down to the pelvis.
Mental cues help here: - Imagine lifting your "chest up" - Imagine straightening your lower back - Imagine pressing your navel toward the floor
When the hips and the bar stay in place at this stage and the back is straight, all the pieces start to be in the right place for the most effective and safe pull possible.
Note: Don't squeeze your shoulder blades together the way you would in, for example, the bench press. The correct position of the shoulder blades in the deadlift is, described anatomically, in depression — i.e. "down" — and apart from each other.
The gaze should usually be directed (also depending on preference/habit) about 1–5 m ahead along the floor. In other words, eyes down and forward. Looking upward often makes the lift and the starting position harder, although many people lift successfully that way too.
At this stage, too, a common mistake is to push the bar forward with the shins and/or to lower the hips. The goal is to keep the position otherwise the same as before; only the back extends to straight. Then simply keep the back straight!
Step 5. Tightening the lats.
To activate the lats and tighten the position, it's useful to
think: "Pull the bar into your shins." Turning the elbows toward yourself also helps here — that is, so that the
elbows point backward. It's good to have the lats tight so that the bar stays close to the body and doesn't swing
forward.
Step 6. Breaking the bar off the floor

Before the bar is lifted off the floor, it's important to brace the whole body and "take the slack out" of the bar, so that the good starting position you've found doesn't fall apart during the break from the floor.
A good cue for the break:
- Imagine pressing your legs through the floor - Imagine leg-pressing the bar up
Don't think about lifting the bar up with your arms or your back.
Start producing force into the bar (imagine pressing your legs through the floor) without breaking the bar off the floor. The idea of this is to pull the slack out of the bar, since barbells often have a little play in them that is good to tighten up before breaking the bar off the ground. Many bars produce a "click" when the extra movement slack is pulled out. You'll surely feel this too. Mental image: If you were pulling a car with a rope, you'd want the rope tight along its whole length for the most effective force production, and you wouldn't yank it suddenly from slack to tight. So you want to be, as it were, "loaded" before lifting the bar. This makes it possible to maintain good technique throughout the entire lifting phase. From here the bar is easy to break off the floor by pressing the legs further through the floor.
It's a fairly common mistake to try to yank the bar up as fast as possible. Sudden force production without tension typically causes the hips to shoot up, the back to round, and the starting position to fall apart, leaving you in a worse position for both safety and performance. Yanking the bar as fast as possible also doesn't necessarily help the break, since statically producing large forces takes 0.5–3 s (unless you have really strong speed-strength qualities).
The starting position is also predisposed to falling apart by the mental image that the movement begins by lifting the bar up. Instead of thinking about moving the bar during the pull, it's better to focus on force production from the legs.
Setup is good. How is the lift itself performed?

In the lift, the first phase — the break from the floor — happens with assistance from the quads, after which the movement is largely hip extension (isometrically, of course, many muscles other than the hip extensors are working).
Based on this, the following are cues that work well for breaking the bar off the floor: 1. When breaking the bar, "press your legs through the floor."
2. Once the bar has risen off the floor to about mid-shin, imagine pushing your hips forward strongly all the way to full extension.
At this stage it's useful to imagine doing this work strongly with the glutes — that is, you squeeze the glutes together, which leads to extension of the hips. At the end, the glutes should be contracted, the hips fully extended, and the lower back at its natural arch. This keeps the back neutral and makes the end of the movement much stronger.
So first the bar off the floor by pressing the legs through the floor, then the hips forward by squeezing the glutes.
During the break, it's best not to rush at first. Rather, especially while learning the movement, start pressing the legs through the floor calmly but forcefully, without a sudden jerk, and keep the position tight. Strength is indeed speed, and fairly quick force production in the concentric phase also appears to be optimal for development when training (González-Badillo et al. 2014), so the goal is a faster — yet always controlled — movement once the technique is under control.
Lockout The lifting phase ends when you stand straight with the bar. The hips, knees and spine are extended, i.e. straight. In the conventional deadlift, the knees and hips extend to lockout at the same time.
A typical mistake is to hyperextend the movement at the end. This is easily corrected by focusing, during the "push the hips forward" phase, on doing this work actively with the glutes — i.e. squeezing the glutes together. At the end the glutes should be contracted, the hips fully extended, and the lower back at its natural arch. This keeps the back neutral and makes the end of the movement much stronger.
.webp)
Image. On the left, correct — glutes tight and lower back neutral. On the right, hyperextension at the end.
Lowering the bar
The bar is lowered in the same way it was lifted, but in reverse order. In the lowering phase you first push the hips backward and lower the bar at the same time. Once the bar has passed the knees, bend the knees and lower the bar to the ground. This way the bar moves down in a vertical line and ends up back at the midfoot in a good starting position.
Note: Once the bar has been lowered to the ground, a new rep starts from a full stop on the floor. It's not advisable to bounce the bar from the bottom up into a new rep, since this hampers the standardization of the reps and the training response.
Why is the bar usually lowered quickly?
Typically the deadlift is done almost purely concentrically. This is an exception among nearly all other strength-training movements. In other words, most commonly the bar is lifted up, then lowered quickly without a more focused eccentric braking phase. Unlike in many movements, in the deadlift the lowering phase is often hard to brake in a controlled way with heavy weights. The baseline recommendation is a fairly quick but controlled lowering. It is, however, also possible to do the eccentric phase in a controlled way, braking more slowly, if the technique is well under control.
Sumo deadlift

The steps presented earlier, as well as the other points of the lift, work in almost exactly the same way in the sumo deadlift too, apart from the foot width. One step must be added to the setup, between steps 3 and 4: actively pushing the knees out and thereby emphasizing external rotation of the thighs. The stance width and the amount of external rotation of the feet are determined by personal preference as well as by individual body structure. As a rule of thumb, the foot position should be such that the shins are vertical when viewed from the front and from the side. So play around a bit with your stance and find a position where this holds true and the lift otherwise feels strong.
In the sumo deadlift the toes typically point outward about 30–45 degrees. If you can extend your hips fully forward and your knees stay in line with your toes (pointing the same direction as the toes), the position is probably good. If the knees don't stay pushed out, the stance is too wide or the toes point out too much. You have to experiment with this and find a position that suits you. Note: because the legs are in more external rotation, the bar must also be set a little closer to the shin (the exact distance depending on the amount of external rotation), again so that the bar comes over the midfoot.
Differences in the break of the sumo deadlift
The break is otherwise done the same way as in the conventional pull, but because the sumo is more quad-dominant, the "press the legs through the floor" phase lasts a bit longer, typically to around the knees or a little past. After that, the "hips forward" phase is again shorter. It's also a good idea to push the knees out strongly throughout the entire lift. This keeps the hips in external rotation and the movement strong. Once the bar passes the knees, push the hips forward by squeezing your glutes together.
One more note on the sumo deadlift: it is often a bit less taxing on the lower back than the conventional deadlift. Otherwise the muscular loading is very similar between the sumo and the conventional deadlift, activating several muscle groups simultaneously.
Breathing
Breathing correctly is extremely important in the deadlift. It's how you get the whole torso tight, which supports the spine and strengthens the lift. This technique is an important topic of its own, and there's more about it in another one of our blog posts.
Very briefly summarized: Before the lift, take a big breath in, hold it, and at the same time brace your torso as if you were preparing to take a punch to the midsection.
In the deadlift you should usually breathe in properly at the latest once you've taken hold of the bar (between steps 2 and 3), but you can also take in air just before the break, or while standing straight before the lift. That said, if you breathe in right at the very beginning before you take hold of the bar, the other steps have to be fairly quick so you don't start to feel dizzy.
The most common mistakes, in a nutshell
-
Lifting without controlled technique
-
Lifting with a rounded back
-
Suddenly lifting the bar without taking out the "slack"
-
Ignoring breathing technique
-
Lowering the bar without controlled technique
-
Doing the deadlift purely for muscle growth; for example, the Romanian deadlift or the stiff-legged deadlift is a better choice, since in those the muscles are loaded through a longer range of motion and stretch the hamstrings and glutes more. The deadlift is an excellent strength movement — perhaps the best full-body strength lift there is — but it's not the best option for muscle growth.
Summary
In this blog series we've now covered the deadlift's theory and mechanics, individuality and sumo vs.
conventional, and, building on these, this technique guide. The idea has been to look at the movement
objectively and, on that basis, to determine and instruct the optimal technique. From these writings you can see
that lifting isn't so simple as just taking hold of the bar and pulling it up. The goal of this deadlift series
is for the movement to be learned as well and as safely as possible. Just like any skill, the deadlift is a
movement that requires practice in order to do it well and to develop as strong as possible, safely. The deadlift
is one of the best movements especially for developing strength.
In addition to technique, progress requires sensibly programmed training. The AITOFIT training app sizes the weights and sets automatically.
Read next
-
Master another essential lift with our step-by-step guide to bench press technique.
-
Need a plan? See how to build the deadlift into a beginner gym workout program.
Check out our training app, which also includes simple deadlift instructions and videos, by clicking
here!
Author: Julius Granlund, M.Sc Exercise Science (Exercise Physiology), University of Jyväskylä | Reviewed by: Tapio Tulenheimo, M.Sc Exercise Science (Exercise Physiology), University of Jyväskylä
Individualized and evidence-based personal training made easily accessible to everyone.